This article will describe how to manage membership category fees, which are set during membership category creation but can also be edited afterwards.
Accessing Membership Fees
1. Log in to your Member365 Administrator Dashboard.
2. On the top bar, click “Membership”.

3. Next to “Membership Categories”, click “Manage”.

4. Find the name of the membership category whose fees you would like to edit, either by typing its name into the bar labelled “Find a membership category” or by locating it in the list, and click its name to edit it.

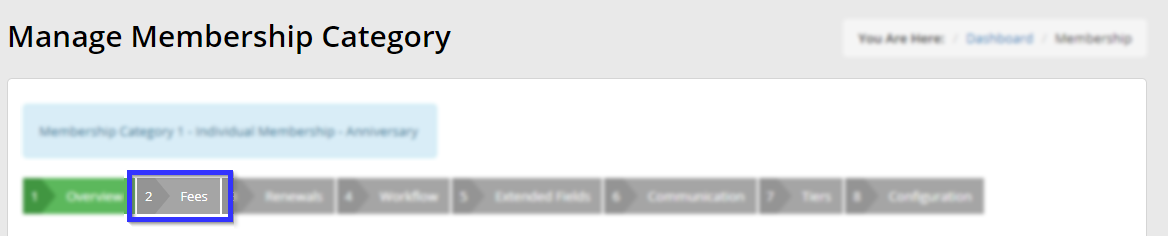
5. Click the “Fees” tab. Here you will find a number of options that will be explained below. Remember that you must hit “Publish” afterwards to save your work.
Fee Options
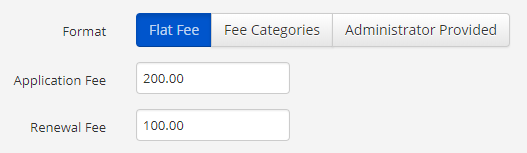
Format
- Decide whether to charge a Flat Fee or Fee Categories.
- Flat Fee: Offer a set application and renewal fee for the membership category.
- Fee Categories: Click “Add” to create a new Fee Category, which allows you to set the fee for this membership to be based on a certain condition. As an example, you can ask your membership applicants to answer based on their annual sales revenue:
-
What is your annual sales revenue?
- In this case, you could use the following options:
0-$1M ($250 Application Fee)
$1M – $5M ($500 Application Fee)
$5M – $10M ($1,000 Application Fee)
$10M + ($1,500 Application Fee)- In this case, the fee for a member with $2M in sales would be charged $250 as their membership fee, but a member with $7M in sales would be charged $1000.

-
- In order to set the question, enter it into the text box under “Question Label”.
- Click “Add” to bring up a text box that allows you to set the name of the fee category that the user will see (“0-$1M”, “$1M-5M”, etc.), the application fee and the renewal fee for that category, then click “Add”. Check the box labelled “Use member’s previous choice for renewals” if you would like the renewal to default to the same fee category.
- Application Fee
- How much you initially charge a new member for applying to this membership category. This amount is only charged to the member on their initial signup to your organization and not on membership renewal.
- Renewal Fee
- How much you charge a member to renew their membership.
- Late Renewal Fee
- Set a fee for late renewals (Individual Memberships only).
- A late fee will only be charged if a member does not renew by their renewal date, and will be applied in addition to your member’s regular renewal fee.
- The setting “# days after rewewal date” dictates when the additional late fee will be applied. To apply a late fee immediately after the membership expires, enter “0” in this field.
- Payment Method
- Set which payment types are accepted for your fees.
- Check: All check payments are recorded in your accounts receivable module to track outstanding payments. Once you have ensured the check is cleared, access the accounts receivable module and mark the invoice as paid.
- Credit Card: Member365 can process and reconcile credit card payments online. Successful payments are recorded and the invoice is updated to reflect any remaining balance owing. If the transaction fails, the user is provided an opportunity to try again, or select another payment method if available.
- Cash: All cash payments are recorded in the accounts receivable module so that you may track who owes you payment. Once you have received payment, access the accounts receivable module and mark the invoice as paid.
- Limit Credit-Card Purchase Amounts
- Set a limit to the highest possible amount that can be paid by credit card. Enabling it by selecting “Yes” will make a text field appear; enter the maximum amount in dollars here.
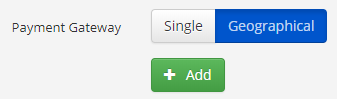
Payment Gateway (Credit Card Only)
- Setup a multi payment gateway allowing members from other countries to use a different payment processor. If you chose to leave this as “Single Payment Gateway” your primary payment processor will be defaulted. To set up other countries with different processors, use this procedure:
Setting Up Country-Specific Payment Gateways
1. Click the “Geographical” half of the toggle button, then click “Add”.
2. Click the first drop-down list and select the country you would like to set up a payment gateway for; click the second and select the payment gateway you would like to assign to that country. 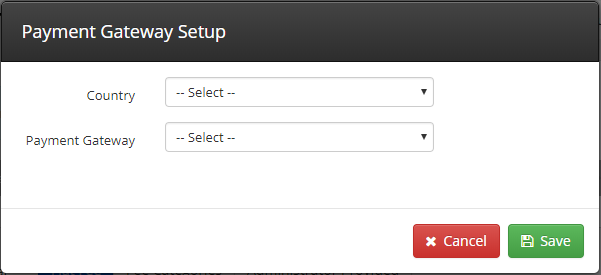
3. Click “Save”.
- Tax Settings
- Set which taxes are applied in each respective country: “Off” will apply no taxes, “Member Location” will apply taxes specific to that member’s location, and “Default” will apply the default taxes set for that country.
After you have made all desired changes to your membership category’s fees, click “Publish” to save your work.
Congratulations, you have configured your membership fees!